DIY: Laptop Sleeve
I can dig the electronic revolution as much as the next girl but the mass-market of cheap knock-off accessories is getting ridiculous. When even the corner stores are stocking kiosks full of ugly crystal encrusted iPad cases, you know things are getting out of hand. If you need a sleeve to slip your indispensable device into, then just head to your closet – or hey, snag whatever’s been left on the floor from your last party. What did ya wind up with? Cosby sweater? Ironic t-shirt? Faded hoodie? Then you got a laptop sleeve. The truth of the matter is you can turn almost any article of clothing into a laptop sleeve, from head to toe.

Image courtesy of care2.com
Sweaters: There are two methods to this felted and non-felted. The felted version is going to involve a sweater that’s made from 100% wool; give it a few washes in hot water then it’s going to be dryer time. Check it in fifteen minute intervals until it fits the size of your laptop – it should feel thick. Snip it to see if it’s ready – if it doesn’t fray, it’s now officially felted. Cut it to fit the laptop, then sew up the side with yarn and a yarn needle. You can glue or sew in Velcro to close. For a non-felt feel, just turn the sweater inside out and trace the outline of the sweater. Sew about a ½ inside the line and trim off the rest. Turn inside out and slide on. To keep case secure, you’ll sew lengths of ribbon along the inside.

Image courtesy of Instructables.com
Hoodie: Much like the non-felted sweater method, you’ll be tracing the outline of your laptop onto the fabric. Make sure the center pocket is justified where you want it; it’s easy to mark your lines using a piece of chalk. Leave about an 1 ½ margin then cut it out, pin it up and sew it.

Image courtesy of planetgreen.com
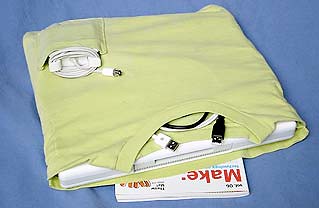
T-shirt: More folding, tracing, cutting, sewing – start with the shirt face up then fold the bottom half upwards, making sure any pockets fall above the fold, then trace your fold. Pin, then sew and cut off excess. Feel free to add some padding in the folds before you sew it up.

Image courtesy of sambot.com
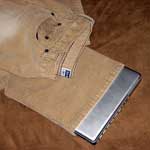
Pants: The trick here is finding a pair of pants that your laptop slides into. It’s also a nice touch to use an (thinner) old sweatshirt for a liner. Make the liner using the same old mark, pin, sew technique then head to the pants. Turn them inside out and cut off the portion you’ll be using then….wait for it…mark, pin and sew it! Slide the liner in and sew along the top. Note: this can be a lot of fabric, so it’s a decent suggestion to use binder clips to hold this all together and watch your machines needle carefully.
You can use this same mark, pin, sew technique on other articles of clothing too – leather jackets and wetsuits are ideal because they’re water resistant and padded. I haven’t quite figured out how to upcycle socks or shoes into a laptop case yet but give me time….


